
Form Builder
https://cybertechtips4u.blogspot.com/2010/07/form-builder.html
Developer Forms Tutorial
Form Builder
Developer Release 6 tools are rapid application development programs. Several parts make up the entire set. We will focus on the Forms component as it is used to generate client side graphical interface applications to work with Oracle servers. Access to Oracle is not a necessity but if you have data coming from Oracle servers then you must have access to it. A valid Oracle userid and password are needed.
Form builder is an application found in the program group for Developer. Locate it and start the application by double clicking on the icon or name of the application. You see the following screen on start.

Figure 1 Starting Screen
Choose the first option (Use the Data Block Wizard) if not selected. We will use the wizard to define our data requirements (the source and the details)for the application. Click OK. Click Next to move to the next window.
The window allows you to choose either a Table or View or a Stored Procedure to be created. A Stored Procedure is a program written in PL/SQL or some other language (JAVA) that may be compiled and stored in the database for use later. A Data Block is a logical space where columns from database tables and elsewhere may be defined. Fields need not always be from a stored table.
Select Table or View option, if not already chosen. Click Next button to move on to the next screen.

Figure 2 Select Type of Data Block
Once you get to the next screen you have to make several decisions. The first , of course, is to select the source table. We are assuming that the data is coming from a table on our server. If that is not the case then we could simply provide any name which would be used by the application. Because we want to use a base table (table on our server), we click the Browse button to browse through the tables and views we have on the server. The system responds with a request to log in to Oracle (see Figure 3).
Once you are connected to the server, you will see a listing of all tables and views in your account. You may also see other tables and views to which you have access privileges. In addition to viewing and selecting tables and views the listing gives a number of other choices. We will stick with tables we have created so far.
Select the TRACKS table from the list and click OK.

Figure 3 Getting the Tables
The following window is displayed. All of the available columns are displayed in the Available Columns window and highlighted. Any or all of these columns may be moved to the Database Items window by clicking on either > or >> respectively. Database items are what the data block wizard uses for defining the data use for the application. It is possible to include a subset of the available columns in our application. This is true if you are building a retrieval only application, or an update application of selected columns. For regular data entry (full rows) you need to specify all the columns.
Once the columns are selected click the Next button. A message screen informing that the data block wizard is completed successfully is displayed. Press Finish button to proceed to Layout design.
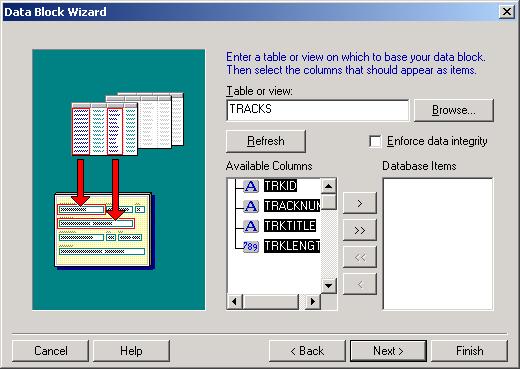
Figure 4 Selecting Columns for Use

Figure 5 Data Block Defined

Figure 6 Selecting Type of Canvas
Different types of canvases are available for our application. The pop-up list for Type, shown below, indicates the different kinds of canvases. The common type is the Content type which is a single window screen. Other type used often is the Tabbed canvas to tab several screen one behind the other each with a tab. Clicking on a tab will bring that screen to the foreground. Stacked canvas may also be used if the application workflow is such that screens are disposed off in a linear sequence.

Figure 7 Pull Down Menu of Canvas Types
Select the type of canvas and click Next. You now have a choice to include selected items or all items for display on the screen. Remember that in the Data Block Wizard we selected the database items to be defined for the block. Now we get to decide whether all of these are to be used for display as well. Any item not chosen for display will go onto the control page/block which only the developer can access!

Figure 8 Select Columns for Display
Clicking Next brings you to the following screen. Here you can change the Prompt text to read better. The width and height of the displayed item can be controlled as well. The values are given in pixels. A better place to adjust these would be on the layout.

Figure 9 Define Prompt Labels
The next screen asks you to select the type of layout desired. You may choose a Form layout or Tabular layout. If you plan to display one record at a time you should choose Form layout whereas if you plan to display multiple records at a time the Tabular layout is preferred.
In the example, we choose the Tabular layout even though Figure 10 shows otherwise.

Figure 10 Choose Type of Interface
Once the layout is decided, you get a new screen where you define the name of the display frame and number of records to be displayed. The number of records to be displayed should be chosen with a view of the screen real estate. By adding a scroll bar option you can view more records than will be displayed at any one time. If you want the records to be spaced you may also include a value for distance between records.

Figure 11 Settings for Tabular Display
Click the Next button and on the next screen press Finish. The system will now generate the layout and display that along with the Object Navigator window in the background. The layout window shows the lay of the columns we chose for display. It also shows the prompts we have chosen. You will notice that the prompts for the Tabular display are on top of the items whereas for Form display they will be to the left of the items.

Figure 12 Layout of the Application

Figure 13 Object Navigator Window
If there are no changes to be made to the layout then we can test the application by clicking on the Traffic Signal Icon. You should see the following window. You are now ready to work with the application.
To save the application design and the compiled version of the Form click Save and name the file. Choose a directory where you have easy access.
To run the application again, start Forms Runtime. Browse to the file that you named earlier. Enter connection details in the appropriate fields and click OK.

Figure 14 Completed Application


